Winter Vanilla Snowflake Cake is a lovely treat that feels like a cozy celebration on a plate. This cake is soft and fluffy with a gentle vanilla flavor that feels just right for chilly days. The snowflake decorations add a charming touch, making it perfect for winter gatherings or just because you want a little sweetness that feels special.
I really enjoy making this cake when the weather gets cold because it reminds me of quiet winter afternoons by the window, watching snow fall outside. The simplicity of vanilla paired with those delicate snowflake designs makes it a cake that’s both comforting and festive. I like to use a simple buttercream frosting that’s smooth and creamy, which helps bring out the vanilla without being too sweet.
When I serve this cake, I like to pair it with a warm cup of tea or hot chocolate – it’s a nice way to warm up and relax. Friends and family always appreciate the way the cake looks, but what they love most is that every bite is tender and lightly sweet, creating that feeling of a snowy winter day in dessert form. It’s one of those cakes that makes you smile before you even take a bite.
Key Ingredients & Substitutions
All-purpose flour: This is the base for a tender, soft cake. You can swap for cake flour to get an even lighter texture, just reduce the amount slightly (about 2 tbsp less per cup).
Butter: Using unsalted butter lets you control the salt in the recipe. If needed, margarine can be a substitute but may affect flavor and texture.
Vanilla extract: Pure vanilla extract gives the best flavor. If unavailable, vanilla bean paste or vanilla powder work well too.
Milk: Whole milk adds richness. For a dairy-free option, use almond or oat milk – just expect a slight change in flavor and moisture.
Powdered sugar (for buttercream): Sifting it is important to avoid lumps and get a smooth frosting texture.
Edible decorations: White and blue sanding sugar gives the snow effect. If you can’t find blue, you can mix a bit of blue food coloring with white sanding sugar. Edible gold decorations add a nice festive touch but are optional.
How Do I Get a Smooth Frosting and Beautiful Snowflake Design?
The frosting and the cake’s snowy look take some care. Here’s how to get it right:
- Beat softened butter well until creamy before adding sugar – this helps avoid grainy frosting.
- Add powdered sugar gradually and beat on high to whip in air and get a fluffy buttercream.
- For a smooth cake surface, apply a thin crumb coat, chill briefly, then add the final layer of frosting with an offset spatula.
- To create the ombré effect, gently tap or brush sugar crystals from bottom to top so the color fades naturally.
- When piping trees on top, keep your hand steady and use a piping tip that creates a ruffled texture for a snowy look.
- Finish with a light dusting of sanding sugar to give a sparkle like fresh snow.
Patience is key! Taking your time with frosting steps helps your cake look clean and polished.
Equipment You’ll Need
- Two 8-inch round cake pans – perfect size for layering and even baking.
- Electric mixer – makes creaming butter and sugar easy and gets smooth frosting fast.
- Mixing bowls – handy for combining dry and wet ingredients separately.
- Offset spatula – helps spread frosting evenly and smooth the cake’s surface with ease.
- Piping bag with star or round tip – lets you create those pretty winter tree shapes on top.
- Baking rack – for cooling cakes evenly without sogginess.
- Pastry brush or small stiff brush – great for applying edible sugar crystals for that ombré effect.
Flavor Variations & Add-Ins
- Add fresh lemon zest and a bit of lemon juice to the batter for a bright, fresh twist on vanilla.
- Mix in ½ cup mini chocolate chips or white chocolate chips to the batter for little bursts of sweetness.
- Swap vanilla extract for almond extract for a nutty flavor that’s still soft and sweet.
- Fold in ½ cup toasted shredded coconut into the frosting for a snowy texture and a bit of chewiness.
Winter Vanilla Snowflake Cake
Ingredients You’ll Need:
For the Cake:
- 2 ½ cups (320g) all-purpose flour
- 2 ½ tsp baking powder
- ½ tsp salt
- 1 cup (230g) unsalted butter, softened
- 1 ¾ cups (350g) granulated sugar
- 4 large eggs, room temperature
- 1 tbsp vanilla extract
- 1 cup (240ml) whole milk, room temperature
For the Vanilla Buttercream Frosting:
- 1 ½ cups (340g) unsalted butter, softened
- 5 cups (600g) powdered sugar, sifted
- 2 tsp vanilla extract
- 3-4 tbsp heavy cream or milk
- Pinch of salt
For Decorations:
- White and blue edible sanding sugar or fine sugar crystals
- Edible gold snowflake toppers
- Edible pearl sprinkles in white and gold
How Much Time Will You Need?
This cake takes about 20 minutes to prepare, 25-30 minutes to bake, and around 20 minutes chilling time for the crumb coat. Decorating will take an additional 15-30 minutes depending on how detailed you want to be. Overall, set aside about 1.5 to 2 hours to complete the whole cake from start to finish.
Step-by-Step Instructions:
1. Preparing the Cake Batter:
Preheat your oven to 350°F (175°C). Grease and flour two 8-inch round cake pans, then line their bottoms with parchment paper for easier removal. In a medium bowl, sift together the flour, baking powder, and salt.
In a large bowl, beat the softened butter and sugar using an electric mixer on medium-high speed until the mixture is light and fluffy, about 4-5 minutes. Add the eggs one at a time, beating well after each addition. Mix in the vanilla extract.
Lower the mixer speed to low and gradually add the flour mixture and milk alternately, starting and ending with the flour. Mix just until combined to keep the batter light.
Divide the batter evenly between the prepared pans and smooth out the tops.
2. Baking and Cooling the Cake:
Bake the cakes for 25-30 minutes or until a toothpick inserted in the center comes out clean. Let the cakes cool in the pans for 10 minutes, then turn them out onto wire racks to cool completely before frosting.
3. Making the Vanilla Buttercream Frosting:
Using an electric mixer, beat the softened butter on medium speed until creamy, about 2 minutes. Gradually add the sifted powdered sugar, one cup at a time, beating well after each addition.
Mix in the vanilla extract, pinch of salt, and 3 tablespoons of cream or milk. Increase the mixer speed to high and beat for 3-4 minutes until the frosting is light and fluffy. Adjust the sweetness or consistency by adding more sugar or cream as needed.
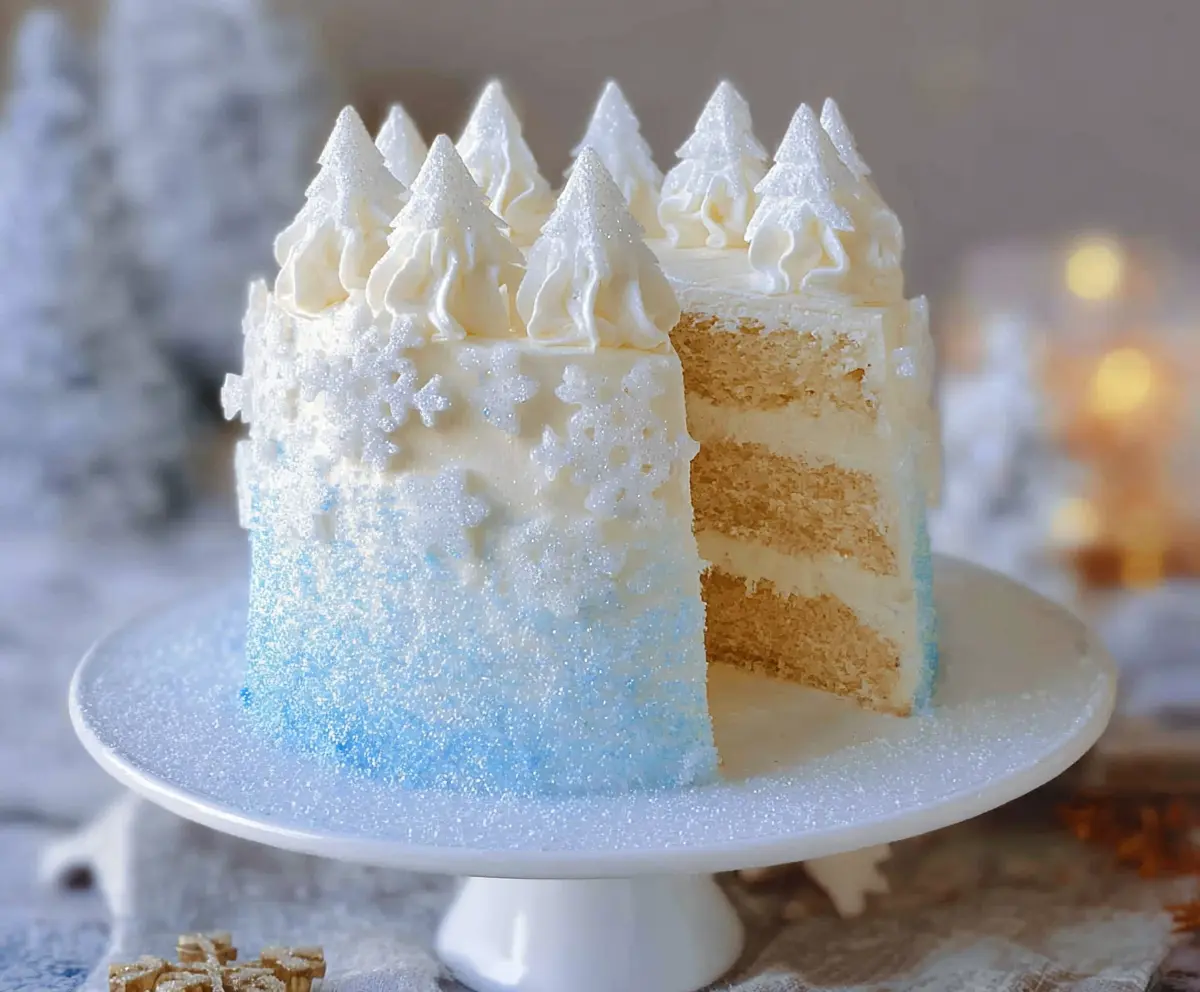
4. Assembling and Decorating the Cake:
If the cakes have domed tops, level them with a serrated knife. Place one layer on your cake stand or plate and spread a generous layer of buttercream on top. Add the second layer and coat the whole cake with a thin crumb coat to lock in any loose crumbs. Chill the cake in the fridge for 15-20 minutes to set.
Apply a final even coat of vanilla buttercream using an offset spatula. To create the ombré blue effect on the sides, lightly brush or sponge edible blue sugar crystals starting from the bottom of the cake, fading upwards into the white frosting.
Decorate the cake sides with gold snowflake toppers and sprinkle edible white and gold pearls to mimic shimmering snowflakes.
Pipe vanilla buttercream dollops shaped like snowy winter trees around the top edge using a star or round piping tip. Dust the piped trees lightly with white sanding sugar for a sparkling snow effect.
Chill briefly to set everything and allow the cake to come to room temperature before serving.
Enjoy your beautiful and delicious Winter Vanilla Snowflake Cake—a perfect centerpiece for cold weather celebrations!
Can I Use Frozen Cake Layers for This Recipe?
Yes, you can! Just be sure to thaw the cake layers completely in the refrigerator overnight before frosting and decorating. Bring them to room temperature before assembling to avoid cracking or sliding layers.
How Should I Store Leftover Cake?
Store leftover cake in an airtight container at room temperature for up to 2 days. For longer storage, keep it covered in the fridge for up to 5 days. Let chilled cake come back to room temperature before serving for the best flavor and texture.
Can I Substitute the Buttercream Frosting?
Absolutely! Cream cheese frosting or whipped cream frosting both pair nicely with vanilla cake. Just keep in mind cream cheese frosting may be less stable at room temperature.
What’s the Best Way to Achieve the Ombre Blue Decoration?
Use a small, stiff brush or a clean sponge to gently apply blue edible sanding sugar starting at the cake’s base. Gradually blend upward by reducing sugar pressure to create a smooth transition from blue to white.
