
When brioche cubes go into the oven, they start soft and buttery, which is lovely for breakfast but tricky in stuffing: bread that’s still damp can turn heavy once broth and eggs are added. Drying the cubes first gives them room to absorb the savory mixture without collapsing. I learned to watch the bread rather than rely on the timer alone; the cubes should feel dry, but they shouldn’t pick up color.
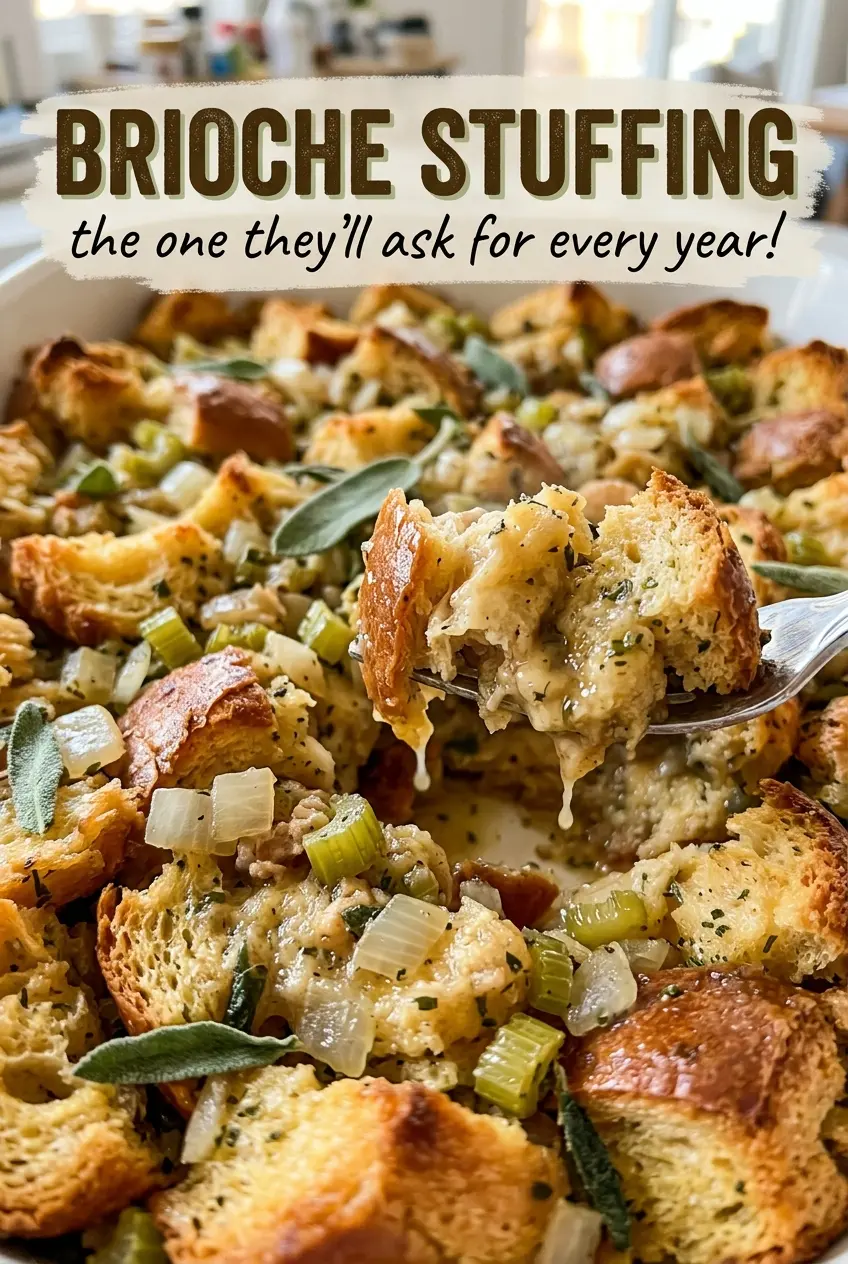
For this brioche stuffing, onion and celery soften in butter before fresh sage and thyme go into the skillet. That order lets the vegetables become tender while the herbs get just a brief turn in the heat. The bread then gets tossed with the skillet mixture, parsley, and a broth-and-egg blend before it bakes under foil and finishes uncovered. The top comes out golden, while the center stays tender enough to scoop.
Kitchen Note
Give the baked stuffing its full 10-minute rest before serving. The center settles during that pause, so it scoops cleanly instead of falling apart while it’s piping hot.
Save this brioche stuffing for its tender center, golden top, and buttery bread that holds its shape.
Why Brioche Needs to Dry Before It Meets the Broth
Brioche is tender and enriched with butter and eggs, so it behaves differently from a firm, lean loaf. Fresh cubes can soak up broth quickly on the outside while staying soft and compressed inside. Once that damp bread is baked with more liquid, the middle is more likely to feel dense than custardy.
Drying the cubes first gives the bread a sturdier surface and a little more capacity to take in the broth mixture. That matters because the bread needs to hold both the vegetable-and-butter mixture and the liquid egg blend without losing its structure. The goal isn’t toasted bread or crunchy croutons; browned cubes would keep darkening during the second bake. Think dry and pale, with enough structure left to soften as the stuffing bakes.
This is also why the cubes are spread in an even layer and stirred once during drying. Crowded or unevenly spread pieces won’t dry at the same pace, so some may be ready while others still feel soft. Consistent cubes help the finished pan bake evenly from edge to center.
What Brioche, Butter, and Broth Each Bring to the Pan

- Brioche — Choose a plain loaf with a soft, fine crumb. Its richness gives the stuffing a tender interior, while its light sweetness rounds out the onion, celery, and herbs. The loaf’s texture matters more than choosing an expensive brand; cut the cubes evenly so they dry at a similar rate.
- Unsalted butter — Butter carries the flavor of the softened vegetables and coats the baking dish. Unsalted butter lets the measured kosher salt season the pan without guessing how much salt is already in the butter. Divide it before cooking so the dish gets its coating and the rest melts in the skillet.
- Yellow onion and celery — These make the savory base and bring moisture to the bread. Dice them evenly so both soften together. Fresh celery ribs with firm stalks give the mixture a cleaner, more noticeable bite than limp celery.
- Fresh sage, thyme, and parsley — Sage and thyme season the warm butter and vegetables; parsley is tossed with the bread for a fresher herbal note. Fresh leaves are useful here because their aroma is part of the stuffing’s character. Chop the sage and parsley, and strip the thyme leaves from their stems.
- Low-sodium chicken broth and eggs — Broth moistens the cubes, and eggs help the mixture set as it bakes. Low-sodium broth leaves room for the kosher salt to do its job without making the finished pan too salty. Whisk the eggs thoroughly into the broth before pouring so the liquid coats the bread evenly.
Dry the Bread, Moisten It Evenly, Then Bake in Two Stages
Drying the brioche cubes
Heat the oven to 300°F and spread the 3/4-inch brioche cubes in an even layer on a rimmed baking sheet. Bake for 35 to 45 minutes, stirring once, until the pieces feel dry but haven’t browned. Check the texture as the end of the range approaches; brioche can go from dry to toasted if left unattended. Set the dried cubes aside while you prepare the skillet mixture.
Softening the vegetables in butter
Grease a 9×13-inch baking dish with 1 tablespoon of butter. Melt the remaining 7 tablespoons in a large skillet over medium heat, then add the diced onion and celery. Cook for 8 to 10 minutes, until the vegetables have softened rather than browned at the edges. Stir in the sage, thyme, kosher salt, and black pepper, and cook for 1 minute.
Coating the bread with the liquid
Put the dried brioche in a large bowl, add the skillet mixture and chopped parsley, and toss to combine. In a medium bowl, whisk the chicken broth and eggs together, then pour the mixture over the bread. Toss until the cubes are evenly moistened, checking the bottom of the bowl for any dry pieces. Let the mixture stand for 10 minutes before moving it to the baking dish.
Baking until the top is golden
Heat the oven to 350°F and transfer the mixture to the prepared baking dish. Cover the dish tightly with foil and bake for 30 minutes; keeping it covered protects the top while the center cooks. Remove the foil and bake for another 20 to 25 minutes, until the top is golden and the center reaches 160°F. The uncovered finish gives the surface color while the egg mixture sets through the middle.
Simple Ways to Adapt This Brioche Stuffing
Make it vegetarian with vegetable broth
Replace the chicken broth with the same amount of vegetable broth. The stuffing will keep its soft, set texture, but the savory base will taste a little less chicken-forward; choose a low-sodium vegetable broth so the seasoning stays balanced.
Leave out the parsley for a quieter herbal finish
Skip the chopped parsley and keep the sage and thyme. The stuffing will taste warmer and less fresh at the finish, while the bread, vegetables, and broth still make a complete pan.
Storage and Reheating
- Refrigerator: Refrigerate leftovers within 2 hours and keep them covered for 3 to 4 days. The top will soften as it sits.
- Freezer: Freeze cooled portions in an airtight container for up to 1 month for the best texture. Thaw in the refrigerator before reheating.
- Reheating: Reheat covered portions in the oven or microwave until the center reaches 165°F. Keep the dish covered so the brioche doesn’t dry out; reheating uncovered can toughen the edges before the middle is hot.
Questions That Come Up When Making Brioche Stuffing
Brioche Stuffing
Ingredients
Equipment
Method
- Heat the oven to 300°F.
- Spread the brioche cubes on a rimmed baking sheet in an even layer and bake for 35 to 45 minutes, stirring once, until dry but not browned.
- Grease a 9x13-inch baking dish with 1 tablespoon of the butter.
- Melt the remaining 7 tablespoons butter in a large skillet over medium heat.
- Add the onion and celery, and cook for 8 to 10 minutes until softened.
- Stir the sage, thyme, salt, and pepper into the skillet and cook for 1 minute.
- Put the dried brioche in a large bowl, add the skillet mixture and parsley, and toss to combine.
- Whisk the broth and eggs in a medium bowl.
- Pour the broth mixture over the bread mixture and toss until evenly moistened.
- Let stand for 10 minutes.
- Heat the oven to 350°F.
- Transfer the mixture to the prepared baking dish and cover tightly with foil.
- Bake for 30 minutes.
- Remove the foil and bake for 20 to 25 minutes, until the top is golden and the center reaches 160°F.
- Rest the stuffing for 10 minutes before serving.
