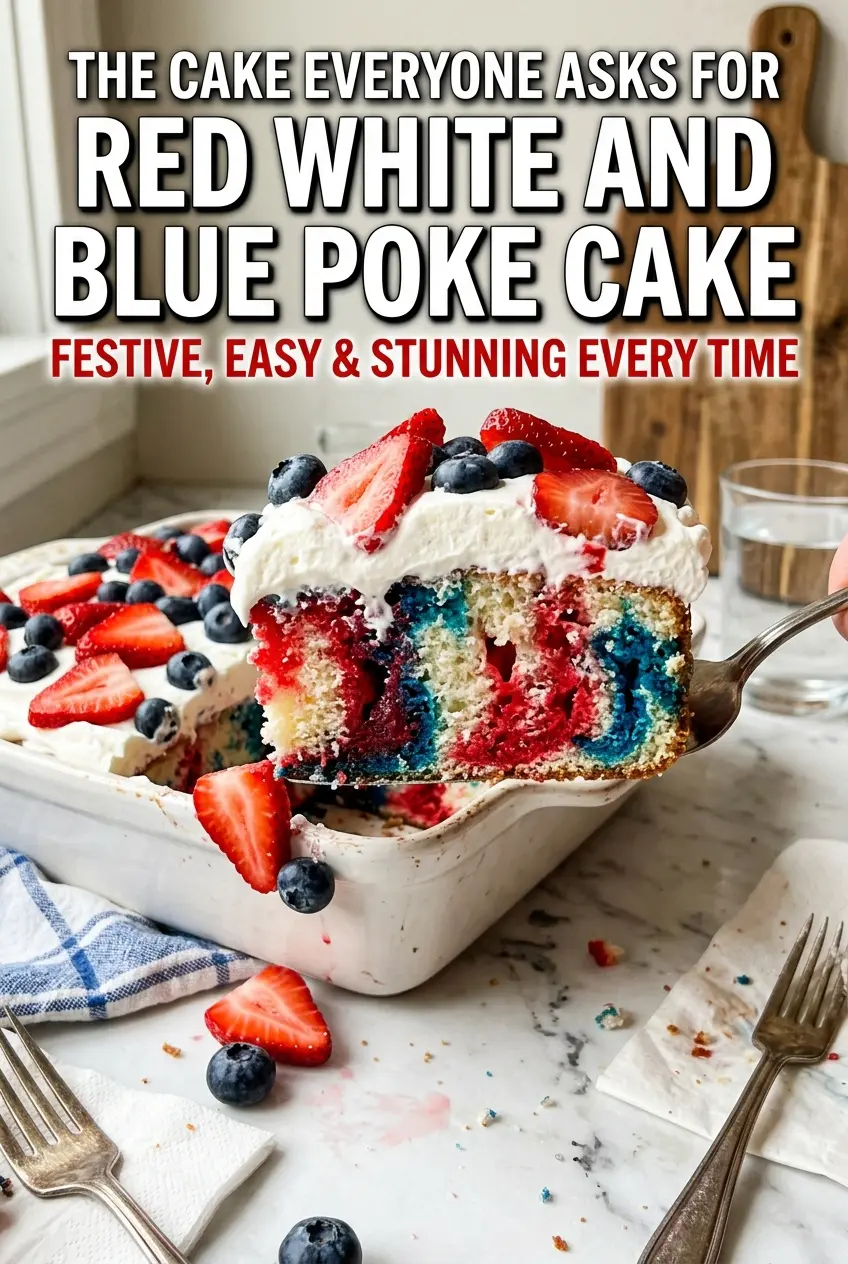
Soft white cake, chilled strawberry and berry blue gelatin, and a thick layer of whipped cream make this poke cake a guaranteed crowd-pleaser. The texture is the real draw here: tender crumb that holds the gelatin without turning soggy, a cool creamy top, and bright fruit on every slice. It looks festive on the table, but the best part is how cleanly it cuts once it has had time to chill.
The trick is to poke the cake while it’s still warm, not hot. Warm cake opens up easily, and the gelatin slides down into the holes instead of pooling on top. I also like using whipped cream instead of a heavy frosting here, because it keeps the cake light and lets the strawberry and blue raspberry layers stay front and center.
Below, you’ll find the timing that keeps the layers distinct, the easiest way to pour the gelatin so the colors stay sharp, and a few simple swaps if you want to change up the toppings without losing that red-white-and-blue look.
The gelatin soaked into the cake evenly and the layers stayed neat after chilling overnight. The whipped cream held up beautifully, and the strawberries and blueberries made every slice look like it came from a bakery.
Red White and Blue Poke Cake with clean gelatin stripes and whipped cream
The Part That Keeps the Gelatin from Pooling on Top
Poke cakes can go wrong in one of two ways: the holes are too shallow, so the gelatin never really gets inside, or the cake is too cool and the liquid just sits on the surface. This version works because you poke it while the cake is still warm and use enough holes to give the gelatin somewhere to go. The result is a cake that tastes evenly infused instead of wet on top and plain in the middle.
The other detail that matters is patience. Once the gelatin goes in, give it time to settle before you add the whipped cream. If you rush that part, the topping can slide or the colors can blur too much. Chill the cake long enough for the crumb to set back up, and the slices come out neat with those bold red and blue streaks running through them.
What the White Cake Mix and Gelatin Are Really Doing Here

- White cake mix — This gives you a light-colored base that lets the red and blue streaks show through clearly. A yellow cake will still work, but it mutes the colors. The mix also bakes up sturdy enough to hold the gelatin without collapsing.
- Eggs, milk, oil, and vanilla — These enrich the boxed mix and keep the crumb soft after chilling. Whole milk adds a little more body than water, which matters here because the cake needs structure once it’s soaked. If you only have 2% milk, it still works.
- Strawberry and berry blue gelatin — The gelatin is what gives the cake its color and that cold, fruity sweetness. Don’t swap in sugar-free unless that’s what you want; it tends to set a little differently and the flavor is thinner. Dissolve it completely in boiling water before adding the cold water, or you’ll end up with grainy bits in the cake.
- Heavy whipping cream — This makes the topping light instead of heavy. Cool the bowl first if your kitchen is warm; cream whips faster and holds better when everything is cold. Whipped topping can stand in, but it tastes sweeter and less fresh.
- Fresh strawberries and blueberries — These aren’t just garnish. They add a fresh, juicy finish that keeps the dessert from leaning too sweet. Slice the strawberries right before topping so they don’t bleed too much onto the cream.
Building the Cake So the Colors Stay Bold
Baking the Base
Mix the cake batter until it’s smooth and pour it into a greased 9×13-inch pan. Bake until the center springs back and a toothpick comes out clean, because an underbaked cake can’t hold the gelatin without turning gummy. Let it rest for about 15 minutes before poking. If it’s too hot, the holes slump shut; if it’s too cool, the gelatin won’t soak in as well.
Making the Holes and Pouring the Gelatin
Use the handle of a wooden spoon to poke holes across the cake in a loose grid, spacing them about an inch apart. Go deep enough to reach most of the cake, but stop before you break through the bottom. Pour the strawberry gelatin over one half and the blue over the other in a slow stream so it has time to sink in instead of running across the top. If you dump it too fast, the colors will mingle and you’ll lose the striped look.
Whipping and Finishing
Chill the cake until it’s fully cold before spreading on the whipped cream. Soft peaks won’t hold up well here, so whip until the cream stands in thick, billowy peaks that keep their shape on the spoon. Spread it gently over the set cake, then add the berries in rows, clusters, or a simple scattered pattern. Once the topping is on, the cake should go back to the fridge until serving so the slices stay clean.
How to Make This Work for Different Crowds and Tastes
Make It Dairy-Free Without Losing the Creamy Top
Use your favorite dairy-free whipped topping in place of the heavy cream, and keep the rest of the recipe the same. The texture will be a little lighter and sweeter, but it still gives you that soft top layer that balances the gelatin-soaked cake. Just check that your cake mix and sprinkles are dairy-free if you need the whole dessert to fit that restriction.
Use Different Gelatin Flavors When You Want a Similar Look
If berry blue isn’t easy to find, blue raspberry works the same way. You can also swap strawberry for cherry if you want a deeper red and a slightly sharper fruit note. The flavor shifts a little, but the visual effect stays the same as long as you keep one red and one blue gelatin.
Make It Ahead for a Party
Bake the cake and add the gelatin a day ahead, then wait to add the whipped cream and fruit until a few hours before serving. That keeps the topping fresh and prevents the berries from weeping into the cream. If you frost it too early, the top still tastes fine, but the clean look starts to fade.
Storage and Reheating
- Refrigerator: Store covered for up to 3 days. The cake stays moist, though the whipped cream softens a little after the first day.
- Freezer: I don’t recommend freezing the finished cake. The gelatin and whipped cream both change texture once thawed and the cake turns watery.
- Reheating: Serve this cake cold straight from the fridge. Warming it melts the topping and loosens the gelatin, which is the fastest way to lose the clean layered look.
Answers to the Questions Worth Asking
Red White and Blue Poke Cake
Ingredients
Equipment
Method
- Preheat your oven to 350°F and grease a 9x13-inch baking dish with non-stick spray.
- Prepare the white cake mix according to package directions using eggs, whole milk, vegetable oil, and vanilla extract, then pour the batter into the prepared dish.
- Bake at 350°F for 28–32 minutes, until a toothpick inserted in the center comes out clean.
- Let the cake cool for 15 minutes.
- While still warm, poke holes all over the cake with the handle of a wooden spoon, spacing them about 1 inch apart, going deep but not through the bottom.
- In one bowl, dissolve the strawberry gelatin in 1 cup boiling water, then stir in 1/2 cup cold water.
- In a second bowl, dissolve the berry blue gelatin in 1 cup boiling water, then stir in 1/2 cup cold water.
- Slowly pour the strawberry gelatin over one half of the cake, letting it seep into the holes.
- Pour the blue raspberry gelatin over the other half, then let the cake absorb the gelatin for 5 minutes.
- Refrigerate the cake for at least 3 hours or overnight.
- When ready to serve, whip the heavy whipping cream with powdered sugar and vanilla extract until stiff peaks form.
- Spread the whipped cream evenly over the chilled cake.
- Arrange the sliced fresh strawberries and fresh blueberries on top in a decorative pattern.
- Add red and blue sprinkles if desired.
- Slice and serve cold, and store leftovers covered in the refrigerator for up to 3 days.
