Strawberry Pretzel Salad earns its place on the table because every bite hits a different note at once: crisp, salty pretzels, a cool and creamy middle, and a glossy strawberry layer that slices cleanly instead of slumping into a mess. It’s one of those old-school desserts that still works because the textures play off each other so well. The crust stays snappy under the filling, and the top layer gives you that sweet berry finish without turning the whole pan soft.
The part that makes or breaks it is the layering. The pretzel crust has to cool completely before the cream cheese goes on, and the cream cheese layer has to reach all the way to the edges so the Jell-O can’t leak through. Let the strawberry mixture cool until it’s no longer hot before you pour it over the filling. If it’s warm, it can melt the layer underneath and you’ll lose those clean, neat squares.
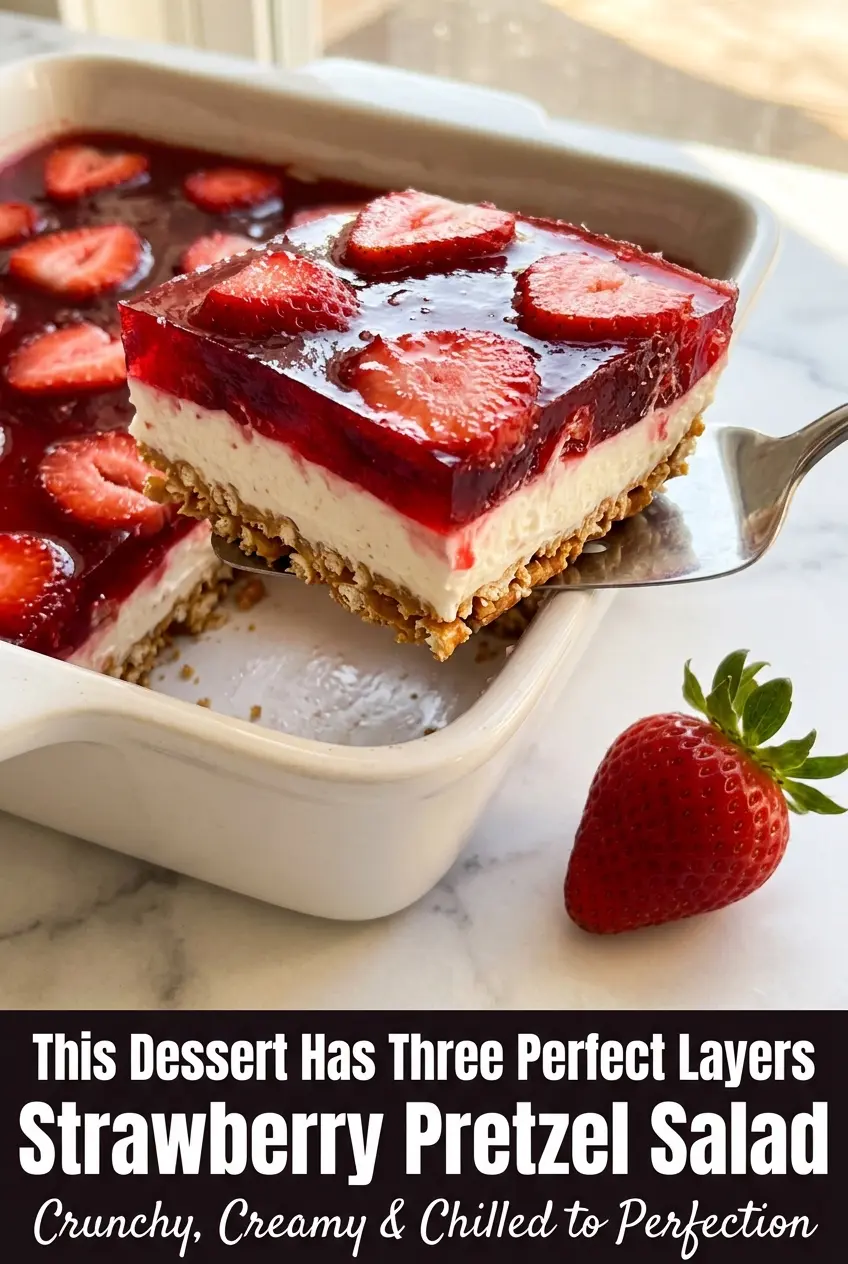
Below, I’m walking through the little details that keep this dessert sturdy: how to keep the crust from getting soggy, why the filling should be spread edge-to-edge, and a few easy swaps if you want to adjust the sweetness or make it ahead for a crowd.
The crust stayed crisp under the cream cheese layer, and the strawberry topping set up perfectly overnight. I was worried the Jell-O would leak, but sealing the edges worked like a charm.
Save this Strawberry Pretzel Salad for the dessert table days when you want a salty-sweet slice that sets up clean and disappears fast.
Why the Jell-O Belongs on a Fully Cooled Crust
The most common mistake with Strawberry Pretzel Salad is rushing the layers. A warm crust will soften the filling before it has a chance to set, and warm Jell-O will slide right through the cream cheese layer instead of sitting on top of it. That’s how you end up with a soggy bottom and streaks of strawberry juice where they don’t belong.
The other detail that matters is the edge seal. Spread the cream cheese mixture all the way to the pan walls, not just the center. That thin border acts like a dam, and it keeps the liquid topping from sneaking down to the pretzel crust while everything chills.
- Pretzels — The salty crunch is what gives this dessert its identity. Crush them into small pieces, but stop before they turn into dust; a little texture keeps the crust from tasting dense. If you only have pretzel sticks or rods, they work fine as long as you measure after crushing.
- Butter — This is what binds the crust and helps it bake into a firm layer. Use unsalted butter so you can control the salt level, since pretzels already bring plenty. If you need to swap, a neutral melted margarine will work in a pinch, but the flavor won’t be as rich.
- Cream cheese — Full-fat cream cheese gives the filling its tang and body. Soften it fully before beating or you’ll get little lumps that never disappear. Reduced-fat versions can work, but the layer won’t taste as plush and it may set a little looser.
- Cool Whip — This keeps the middle light and sliceable. Whipped cream can be used, but it softens faster and the texture won’t hold as long in the fridge. If you do substitute homemade whipped cream, fold it in gently and serve the dessert the same day.
- Strawberries — Fresh berries give the topping actual fruit flavor and a clean bite. Frozen berries are fine too, but thaw and drain them first so they don’t water down the Jell-O. If your berries are large, slice them small so each square gets an even layer.
Building the Layers Without Letting Them Melt Together
Pressing and Baking the Crust
Mix the crushed pretzels with melted butter and sugar until every piece looks coated, then press the mixture firmly into the bottom of the pan. The crust should feel packed down and even, not loose or sandy, because it has to hold up under a creamy layer and a wet topping. Bake it just until set and lightly golden at the edges. If it goes too dark, the pretzels can taste bitter and the crust loses that clean salty crunch.
Whipping the Center Until It’s Smooth
Beat the softened cream cheese and sugar until the mixture looks fluffy and no grainy bits remain. Cold cream cheese is the fastest way to get a lumpy filling, so let it soften on the counter before you start. Fold in the thawed whipped topping by hand, using a gentle motion so you keep the filling airy. Spread it in a thick, even layer and drag it right up to the sides of the dish.
Cooling the Strawberry Layer Before It Hits the Pan
Dissolve the Jell-O in boiling water until it’s completely clear, then let it cool to room temperature before adding the strawberries. If it’s still hot, it can soften the cream cheese layer and blur the lines between the layers. Once the liquid feels cool but still pourable, stir in the sliced berries and pour it slowly over the top. Chill until the whole dish is firm enough to cut without dragging through the filling.
Make It a Little Less Sweet
If you want a sharper finish, reduce the sugar in the cream cheese layer by a few tablespoons. The dessert still holds together, but the strawberry topping tastes brighter and the pretzel crust comes through more clearly. This is the easiest way to keep the pan from tasting candy-sweet.
Gluten-Free Version
Use gluten-free pretzels and crush them the same way. The crust still bakes up crisp, and the rest of the dessert is naturally gluten-free as long as your whipped topping and gelatin are certified gluten-free. The texture stays close to the original, which is rare for a swap this simple.
Fresh Berries Only
If you’re using all fresh strawberries, slice them thin enough that they settle evenly in the Jell-O. Bigger chunks can clump and make the top look uneven when you cut it. Fresh berries give the best texture here, especially if you want the topping to look bright and clean.
Storage and Reheating
- Refrigerator: Store covered for up to 3 days. The crust slowly softens under the filling, so it’s best in the first 24 to 48 hours.
- Freezer: I don’t recommend freezing it. The Jell-O layer turns watery and the cream cheese filling loses its smooth texture when thawed.
- Reheating: No reheating needed. Serve it straight from the fridge, and use a sharp knife wiped clean between cuts so the layers stay neat.

Questions I Get Asked About This Recipe
Strawberry Pretzel Salad
Ingredients
Equipment
Method
- Preheat oven to 350°F (175°C). Crush pretzels into small pieces for texture, not fine crumbs.
- Mix crushed pretzels with melted butter and granulated sugar until fully coated. Press the mixture firmly and evenly into the bottom of a 9x13 baking dish.
- Bake the crust for 10 minutes until lightly golden and set. Remove from oven and let it cool completely before adding the next layer.
- Beat softened cream cheese and granulated sugar until smooth and fluffy. Gently fold in the thawed Cool Whip until fully combined and airy.
- Spread the cream cheese mixture over the completely cooled pretzel crust, sealing to the edges. This helps prevent the Jell-O from seeping into the crust.
- Refrigerate the cream cheese layer for at least 30 minutes to firm up.
- Dissolve both packages of strawberry Jell-O in 2 cups of boiling water. Stir well for 2 minutes until completely dissolved.
- Let the Jell-O mixture cool to room temperature for about 20–30 minutes. It should be liquid but not hot.
- Stir the sliced strawberries into the cooled Jell-O mixture. Gently pour it over the cream cheese layer.
- Refrigerate the entire dish for at least 4 hours or overnight until the Jell-O layer is fully set. Slice into squares and serve cold, keeping leftovers refrigerated.
