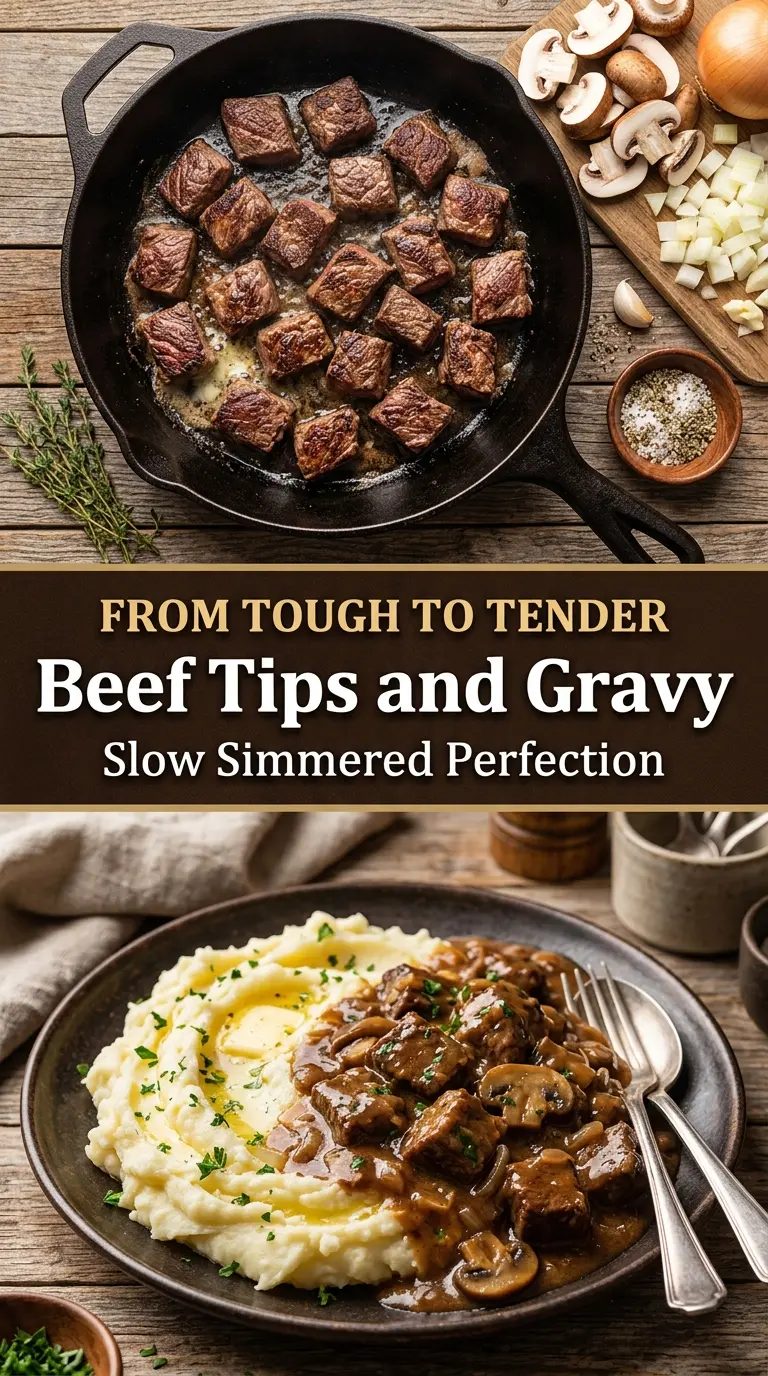
Tender beef tips in a glossy gravy land on the table like the kind of dinner people remember. The beef gets browned first, then simmered low until it turns fork-tender without falling apart into shreds. That sear matters. It gives the gravy a deeper, meatier base and keeps the whole dish from tasting flat.
The mushrooms and onions do more than fill out the pan. They carry the gravy, add body, and pick up every bit of browned flavor left behind from the beef. A little Worcestershire brings the savoriness into focus, and the flour-cooked vegetable base keeps the sauce smooth instead of chalky. Serve it over mashed potatoes and you get the kind of meal that settles in and disappears fast.
If you’ve made beef tips before and ended up with chewy meat or thin gravy, the sections below will help you dodge both problems. The key is patient simmering, not aggressive boiling, and a proper browning stage before anything else goes in.
The gravy thickened up beautifully and the beef was actually tender after simmering, not stringy. I served it over mashed potatoes and my husband went back for seconds without even talking.
These beef tips and gravy are worth saving for the nights when you want a slow-simmered dinner with rich gravy and tender beef over mashed potatoes.
The Secret to Beef Tips That Turn Tender Instead of Tough
Beef tips usually go wrong in one of two places: the pan is crowded, or the simmer is too aggressive. Crowding traps steam and prevents real browning, which means less flavor in the gravy. Boiling hard does the opposite of what you want for stew meat. It tightens the meat fibers and gives you chewy bites even after a long cook.
The fix is straightforward. Brown the beef in batches so each piece gets direct contact with the hot pan, then let it simmer gently in the gravy until the connective tissue softens and the meat starts to give when you press it with a spoon. You’re looking for a low, steady bubble, not a rolling boil. If the liquid is churning, turn it down.
- Brown in batches for better color and a richer sauce.
- Keep the simmer low so the beef tenderizes instead of tightening up.
- Cook long enough for fork-tender texture, not just until the outside looks done.
What Each Ingredient Is Actually Doing in This Dish
- Beef stew meat or sirloin tips — Stew meat gives you that slow-simmered comfort food texture, while sirloin tips cook a little faster and stay a touch more structured. If you use stew meat, choose pieces that look evenly cut so they tenderize at the same pace. Large uneven chunks can leave you with a mix of done and underdone meat.
- Mushrooms — They add body and a deep savory note that makes the gravy taste like it simmered longer than it did. White mushrooms work fine, but cremini give a darker, earthier flavor. Slice them thick enough that they hold some shape after cooking.
- Flour — This is what turns the pan juices and broth into gravy instead of a thin sauce. Cook it for a full minute with the vegetables so the raw flour taste disappears. If you need a gluten-free version, use a 1:1 gluten-free flour blend and whisk it in the same way.
- Worcestershire sauce — It’s the quiet ingredient that makes the gravy taste finished. You don’t taste it as a separate flavor; you taste depth. If you don’t have it, a little soy sauce or tamari can cover some of that savory ground, though the flavor won’t be exactly the same.
- Beef broth — Use a broth you’d actually drink from a spoon. Since the gravy is mostly built from broth, a weak one gives you a weak result. Low-sodium broth gives you more control over the final seasoning.
Building the Gravy in the Same Pot You Brown the Beef In
Seasoning and Searing the Beef
Coat the beef with the salt, pepper, garlic powder, and onion powder before it hits the pan. The seasoning on the surface helps the crust taste like something instead of plain browned meat. Heat the oil until it shimmers, then add the beef in a single layer and leave it alone long enough to develop a dark golden crust. If the meat sticks hard at first, it usually needs another minute; once it sears properly, it releases more easily.
Softening the Onion and Mushrooms
After the beef comes out, the onions and mushrooms go into the same pot with butter. That leftover fond on the bottom is where the gravy gets its depth, so don’t wash it away. Cook until the onions look translucent and the mushrooms have given up their liquid and started to take on color. If the pot seems dry, the mushrooms were likely cut too large or the heat was too low.
Turning the Pan Drippings Into Gravy
Sprinkle the flour over the vegetables and stir constantly for about a minute so it coats everything evenly. Then whisk in the broth slowly so the flour can dissolve without clumping. This is where rushing causes problems. If you dump the liquid in all at once, you can end up with a lumpy gravy that never smooths out. Keep whisking until it looks silky before the beef goes back in.
The Slow Simmer That Makes the Meat Tender
Return the beef and any juices to the pot, then cover and cook on low until the meat gives easily when pierced. You want occasional bubbles, not a boil. Stir now and then so nothing catches on the bottom, and add a splash of broth if the gravy gets too thick before the beef is done. When it’s ready, the gravy should cling to the spoon and the beef should feel soft without falling apart.
How to Change This Dish Without Losing What Makes It Work
Make It Gluten-Free
Swap the all-purpose flour for a 1:1 gluten-free flour blend. Cook it in the butter and vegetables the same way so it loses the raw taste, and whisk in the broth slowly. The gravy will still thicken well, though it may set a little more softly than a wheat-based version.
Use Sirloin for a Faster Dinner
Sirloin tips need less time than stew meat and are the better pick if you want dinner on the table sooner. Start checking them earlier, around the 45-minute mark, because they can go from tender to dry if you let them simmer like a tougher cut. The gravy stays the same.
Skip the Mushrooms
If mushrooms aren’t your thing, leave them out and add an extra half onion for more base flavor. The gravy will be a little lighter and less earthy, but it still works because the browned beef and Worcestershire carry the savory side of the dish.
Storage and Reheating
- Refrigerator: Store for up to 4 days. The gravy thickens as it chills, and the beef stays tender if you reheat it gently.
- Freezer: It freezes well for up to 2 months. Cool it completely first, then pack it in airtight containers with a little room at the top.
- Reheating: Warm it on the stove over low heat with a splash of broth or water. High heat can tighten the beef and make the gravy separate, so go slow and stir often.
Answers to the Questions Worth Asking

Tender Beef Tips and Gravy Over Mashed Potatoes
Ingredients
Equipment
Method
- Season the beef with salt, black pepper, garlic powder, and onion powder.
- Heat olive oil in a large Dutch oven or deep skillet over medium-high heat until shimmering.
- Brown the beef in batches until deeply seared, 3–5 minutes per batch, without moving it too often.
- Remove the beef and set aside.
- Add butter, onions, and mushrooms to the pot and cook until softened, 5–6 minutes, stirring occasionally.
- Sprinkle flour over the vegetables and stir for 1 minute to cook off the raw flour taste.
- Slowly whisk in beef broth until smooth, 1–2 minutes, making sure no lumps remain.
- Stir in Worcestershire sauce and dried thyme until evenly combined.
- Return the beef to the pot, spreading it into the gravy.
- Cover and simmer on low heat until fork tender, 1½ to 2 hours, stirring occasionally and scraping the bottom to prevent sticking.
- If the gravy gets too thick, add additional broth as needed during the simmer.
- Adjust seasoning to taste before serving.
- Serve the beef tips and gravy over mashed potatoes and garnish with fresh parsley.
