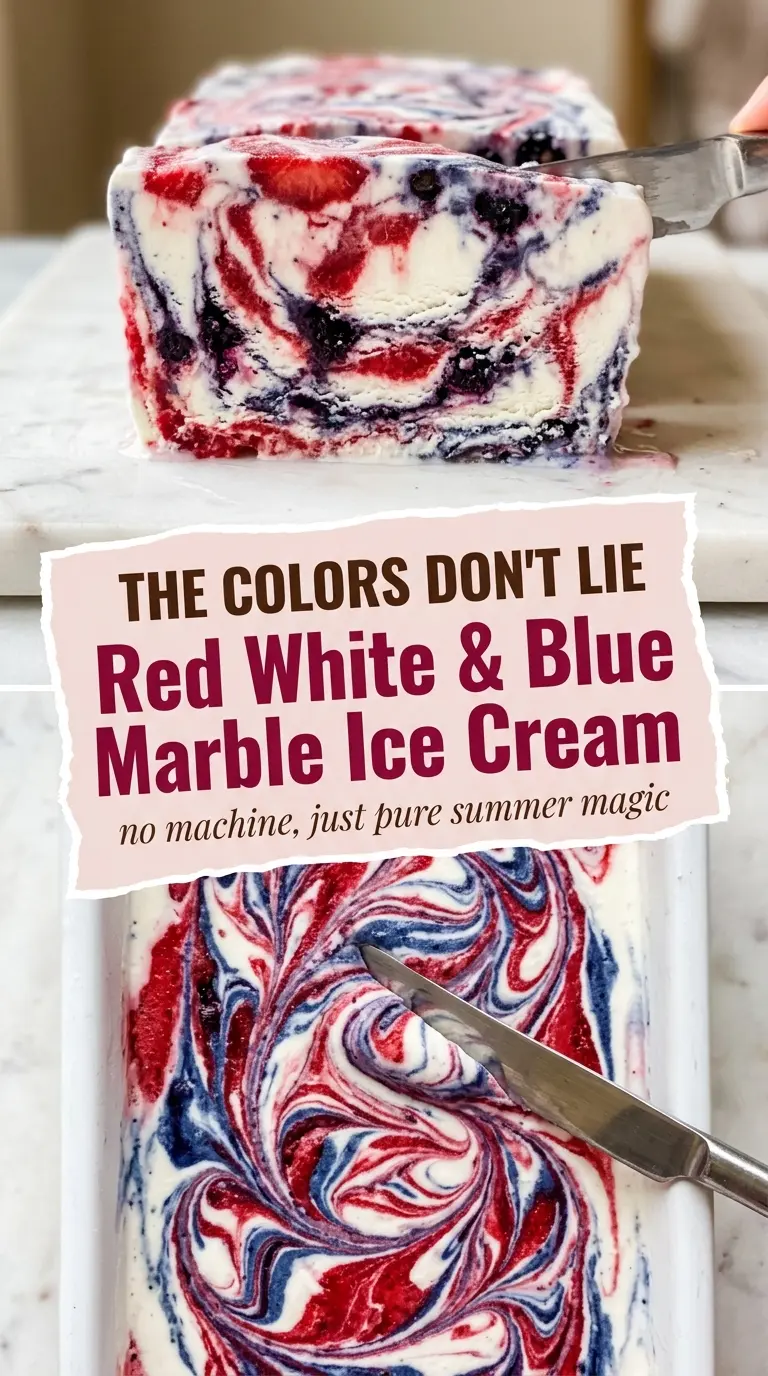
Red, white, and blue marble ice cream turns a simple no-churn base into something that looks bakery-fancy the second you slice into it. The vanilla cream stays plush and scoopable, while the strawberry and blueberry ribbons set up into bright, jammy streaks that hold their color instead of disappearing into one pale swirl. Every spoonful lands a different balance of creamy, tart, and sweet.
The trick is cooking the fruit down until it’s thick enough to sit on top of the cream without bleeding through the whole pan. Both swirls need to be fully cool before they go near the whipped base, and the folding has to stay gentle so the ice cream keeps that light texture you want from a no-churn dessert. A loaf pan also helps create those dramatic layers and keeps the marbling visible when you scoop.
Below, I’ve included the exact swirl technique that keeps the colors bold, plus the small storage details that matter when you’re making this ahead for a party. The difference between pretty and muddy is only a few strokes of the knife.
The fruit swirls stayed separate and the ice cream scooped cleanly after an overnight freeze. I loved that the strawberry layer tasted like jam instead of icy fruit, and the blueberry ribbons were bright without turning the whole pan purple.
Keep this red, white, and blue marble ice cream handy for summer parties when you want a no-churn dessert with bold swirls and easy overnight prep.
The Secret to Keeping the Swirls Bold Instead of Muddy
Marbled ice cream fails in one of two ways: the fruit sauce is too thin, or the swirling goes on too long. Thin sauce sinks. Over-swirling blends everything into one pastel color. The goal here is not to distribute the fruit evenly. It’s to leave distinct ribbons that freeze into clean streaks.
Cooking the strawberries and blueberries down with sugar and lemon juice does two jobs at once. It concentrates the flavor and gives each swirl enough body to sit on the cream. The lemon juice sharpens the fruit and keeps the sauces from tasting flat after freezing, when cold temperatures dull flavor more than most people expect.
- Reduce until thick and glossy — The fruit should mound on a spoon, not run off in a thin puddle.
- Cool completely before layering — Warm sauce starts melting the whipped cream and leaves you with a dense, icy streak instead of a marbled one.
- Use only a few knife passes — Four or five long swoops are enough. After that, the colors start blending into each other.
What Each Ingredient Is Doing in This Ice Cream
Heavy whipping cream brings the structure. Once it’s whipped to stiff peaks, it traps air that gives the finished ice cream its light, scoopable texture without an ice cream machine. Buy cream that’s cold all the way through; warm cream takes longer to whip and won’t hold the same volume.
Sweetened condensed milk is doing the sweetening and the softening. It keeps the base from freezing rock-hard, which is one of the biggest problems with homemade no-churn ice cream. Don’t replace it with regular milk or cream and expect the same result — the texture will be thinner and icier.
Strawberries and blueberries are worth using fresh when they’re in season, but frozen berries work well here too. Frozen fruit actually helps because it breaks down fast in the pan and makes a thicker sauce with less effort. If you’re using very watery berries, just keep cooking until the sauce looks jammy and reduced.
Lemon juice keeps both fruit swirls bright. It doesn’t make the dessert taste lemony; it just sharpens the berries so they still taste vivid after freezing. That small hit of acid matters more than people think in cold desserts.
Building the Layers Without Losing the Marbling
Cook the Fruit Down First
Put the strawberries in one saucepan and the blueberries in another with sugar and lemon juice, then cook over medium heat until the berries burst and the mixture thickens. Stir and mash as they soften, but don’t rush the last few minutes; the sauces need to look glossy and spoonable, almost like loose jam. If they’re still watery, they’ll sink into the cream and turn the whole pan gray-purple.
Whip the Cream to Stiff Peaks
Beat the cold cream in a chilled bowl until it holds firm peaks that stand upright when you lift the beaters. Stop there. If you keep going, the cream starts to turn grainy, and that makes folding harder and the final texture less smooth. The base should look airy and thick, not loose or foamy.
Fold and Layer Gently
Stir the sweetened condensed milk, vanilla, and salt into the whipped cream with a spatula until just combined. Then spread one-third of the mixture into the loaf pan and drop spoonfuls of the cooled fruit sauces over the top. Repeat the layers, keeping the spoonfuls fairly distinct so the knife has something to drag through later.
Swirl Only a Few Times
Run a butter knife or skewer through the layers in wide S-curves. Don’t stir. The less you move the pan, the more dramatic the final pattern will be. Once the colors start to look evenly mixed from above, you’ve gone too far.
Make It With Mixed Berries
Swap either berry swirl for raspberries or blackberries if that’s what you have. The method stays the same, but raspberries give a sharper tartness and blackberries make a deeper, almost wine-colored ribbon. Keep the cooking time flexible and reduce until the sauce is thick enough to hold its shape.
Dairy-Free Version
Use a full-fat coconut whipping cream and a dairy-free sweetened condensed milk alternative. The texture will be a little softer and the finished ice cream will carry a faint coconut note, but it still freezes into clean scoops. Chill the coconut cream thoroughly before whipping so it holds enough air.
Less Sweet, More Tangy
Cut the sugar in each fruit swirl by a teaspoon if your berries are already sweet. That leaves the fruit brighter and keeps the dessert from leaning too candy-sweet against the condensed milk base. Don’t reduce the condensed milk unless you’re prepared for a firmer, less creamy freeze.
Storage and Reheating
- Refrigerator: Not recommended. This dessert melts quickly and loses its structure once chilled but unfrozen.
- Freezer: Store tightly wrapped for up to 2 weeks. Press plastic wrap directly on the surface to prevent ice crystals from forming.
- Reheating: No reheating needed. Let it sit at room temperature for 3 to 5 minutes before scooping so the knife slides through cleanly instead of breaking up the top.
Questions I Get Asked About This Recipe

Red White & Blue Marble Ice Cream
Ingredients
Equipment
Method
- Combine strawberries, 2 tbsp granulated sugar, and 1 tsp lemon juice in a small saucepan. Cook over medium heat for 8–10 minutes, mashing gently, until thick and jammy, then turn off the heat.
- Strain the strawberry swirl if desired to remove seeds, then cool completely. Spread it out if you need faster cooling.
- Combine blueberries, 2 tbsp granulated sugar, and 1 tsp lemon juice in a small saucepan. Cook over medium heat for 8–10 minutes, stirring and mashing gently until deep purple and thick, then turn off the heat.
- Cool the blueberry swirl completely before assembling. It should be room temperature so it doesn’t melt the cream base.
- In a large chilled bowl, beat the cold heavy whipping cream with a hand mixer on high speed for 3–4 minutes until stiff peaks form. Stop when it holds a peak and looks thick, because overbeating can turn grainy.
- Gently fold sweetened condensed milk, vanilla extract, and salt into the whipped cream just until combined. Keep the mixture fluffy and don’t stir so long that the air deflates.
- Pour one-third of the white cream base into a 9×5 loaf pan. Drizzle generous spoonfuls of strawberry sauce over the top as the first red layer.
- Drizzle generous spoonfuls of blueberry sauce over the red layer. Repeat by adding another layer of white cream, then more strawberry and blueberry swirls.
- Drag a butter knife or skewer through the layers in long, sweeping S-curves for 4–5 passes only. Less is more—stop when you see marbling starting so the colors don’t muddy.
- Cover the loaf pan tightly with plastic wrap pressed directly on the surface. Freeze for at least 6 hours, preferably overnight, until completely firm.
- Let the ice cream sit at room temperature for 3–5 minutes before scooping. The edges should soften slightly while the center stays firm.
- Top each serving with fresh strawberries and fresh blueberries, plus white sprinkles or star-shaped sugar decorations if using. Serve immediately after garnishing.
